 |
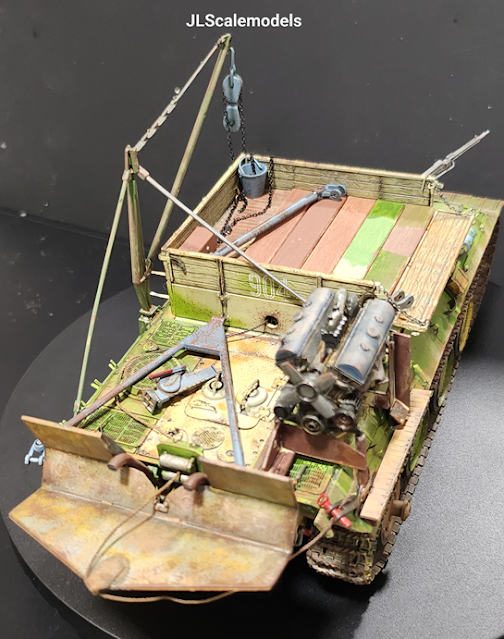
| 85% completed |
As a scale modeller, this stage of using oils to create faded surfaces, dirt and streaks are the most fun. Using just oils alone can account for most of the weathering effects on a scale model kit. There is not limit to how one can weathered their scale model. However, as a hobby, i do find weathering needs to be balance. Currently, scale modellers are spoiled for choices with oil paints. Abteilung 502 offers a range of oil paints in military and weathering colours, saving time if you are not keen to mixing your own color palette. The other make is AK interactive weathering Products with their range of AK Oilbrushers
Now it's time to use artist oils and it's opacity and transparency properties to create simulated effects of grime, oils, shadows, streaks, rust, mud on to the model. Artist oils are classes of paint with high pigment content, which results in rich, vibrant colors. Suspended in linseed oil medium, they have long drying time which allows artist to continue adjusting colours, tones and texture on canvases which makes them the number one choice of paint for artist. Due to the high pigment load, a small amount of oil paints goes a long way and due to the oil medium, the paint usually dries glossy. Good brand of Artist oils includes Winsor & Newton and Gamblin are good starter with their rich colours. To begin weathering your scale model kit, you would need a Weathering or fading horizontal surfaces- using Artist oils transparency properties to glaze over the horizontal surface, to create variations of faded or weathered surfaces
- For fading look (example: faded paint over dark green base colour.)
- Wet the work surface with odourless thinner for artist oil using a round bristle brush of reasonable size. Allow to dry for 30~60 seconds
- Use a toothpick to apply dots of white, yelllow and dark green over the wetted work surface.
- Wet the same round bristle brush with very small amounts of thinner and ever so gently dab on to the dotted colours at random to "mix the dots into a light shade of green".
- Varied the glazed colour by varying dabbing pressure and timing strokes on the work area. You will notice, heavier pressure will deposit more glaze BUT would also licked up if left to long on the work surface. Continue this until a satisfactory look is achieved.
- Move to another work area whlist letting the first section dry.
- Allow weathered surfaces to dried completely. Artist oils takes over 24 hours to completely dry of the weather is wet or humid. By wetting brush with thinner, sections can be re-work if required.
Streaking on vertical surfaces for rust stains, grime and mud
- For streaking onvertical surfaces, the approach is similar.
- Wet the work surface with odourless thinner for artist oil using a round bristle brush of reasonable size. Allow to dry for 30~60 seconds
- Use a toothpick to apply dots of random warm or cool colours on the work area.
- Use a damped flat brush to pull from the top, vertically down in one direction.
- Offload excess paint from flt brush onto papertowel, re-wet flat brush with thinner.
- Continue technique removing excess paint to achieve desired streaked effect.
Note of Warm and Cool Colour
The same dirt would look different in different regions of the world. In a arid climate i.e. middle east. The same brown dirt would have more white and yellow components making the dirt show in light brown (hence warm colours) The same dirt in Northern Europe will have more hues of umber, blue and red for cool colours. Depending on the context of the model kit, use appropiate warm or cool tones to fade or weather the model kit.
 |
| Top horizontal surfaces using a combintaion of white, burnt sienna, raw umber, yellow Artist Oils. |
 |
| Top and vertical surfaces completed. |
 |
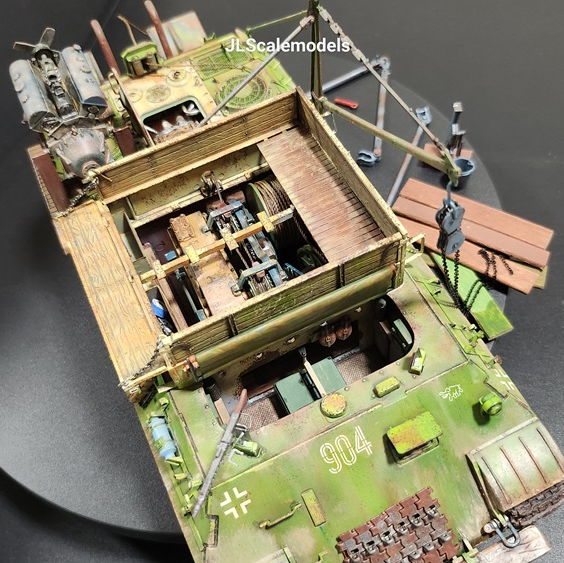
| Vertical Streaks on the frontal slope of the Hull. |
 |
| Vertical surfaces Streaks of using dot technique |
 |
| Vertical Streaks of using dot technique |
 |
| Application of oils ( Circle in Red) |
The top photo stated 85% completed. Usually, after the oils have dried. most modellers will proceed to fix pigments of bottled mud and powder pigments. I, for one is not a huge fan of afixing pigments as they are rather messy. If mud is to be created, the method used is a mixture of pastel power mixed with oil paint colour to give a rich and texture.
Here more shots of the completed Italeri's 1/35 scale German BergePanther . 


See you in the Next Post where we look at Model Collect- "Fist of War" E-60 Paper Panzer!


